RESTool 2.0 (demo)
The best tool in the neighborhood. Managing your RESTful APIs has never been so easy.
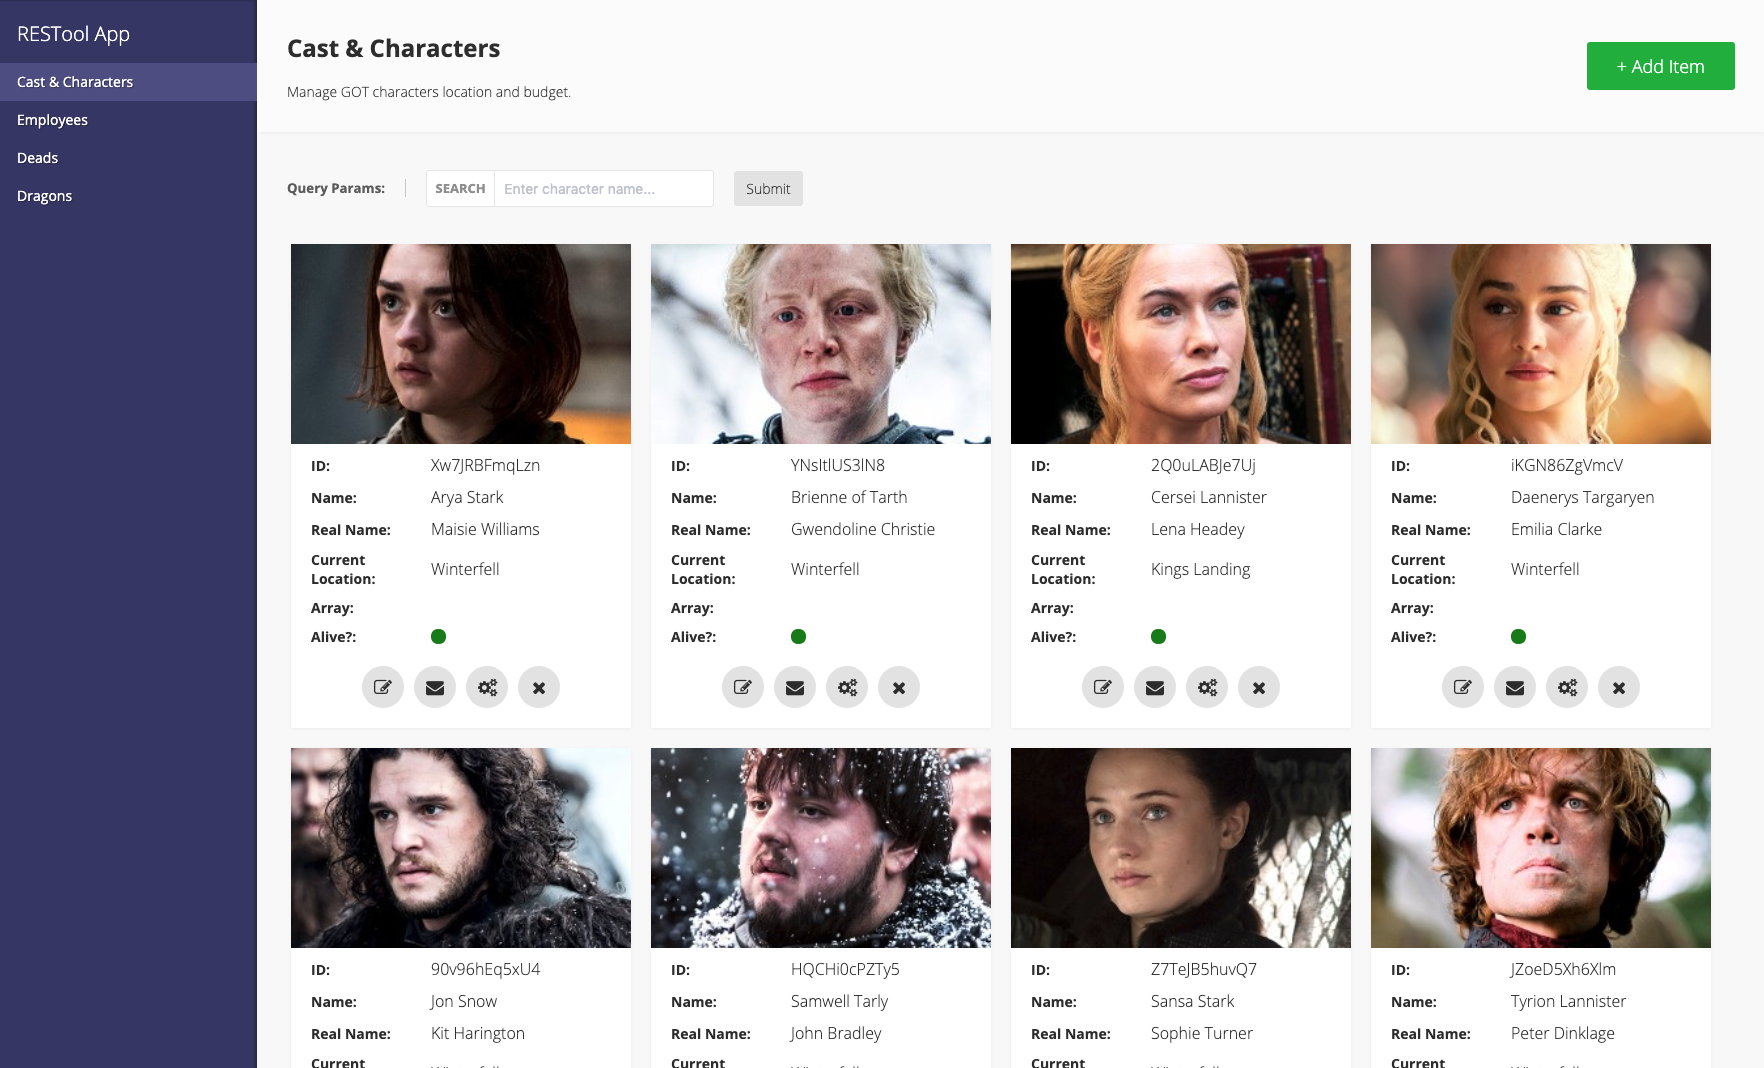
RESTool gives you an out of the box UI that connects to your RESTful API with a simple configuration file.
The idea behind it is simple. Given the fact that each entity in your API has a RESTful implementation, RESTool will provide you UI tool for managing these entities in no time by simply editing a configuration file. No front end engineers, no JavaScript, no CSS, no html. Just a simple JSON file.
Live Demo: https://dsternlicht.github.io/RESTool/
While RESTool originally was developed with Angular, we decided to rewrite it from scratch and move to React. The main reason we moved to React is the community. Since React is so popular we believe that choosing React over Angular will get a much wider community support.
Some new features and capabilities in V2:
- From Angular to React & Typescript
- Full mobile support
- Cards layout
- Custom app colors
- Data path extraction from arrays
- New & improved design
- Internationalization (i18n) support with auto-detect browser language
- Custom favicon support
- Custom icons for actions
- Better error handling in configuration and requests
If you only interested in using RESTool on its latest version as a management tool for your RESTful API, read the docs about configuration, deployment, and consuming RESTool from CDN.
If you wish to extend RESTool's functionality and develop on top of it, please go to the development section.
One of the best things about RESTool (and the reason we actually built it) is that you don't need to develop anything. Everything is configurable and may be set simply by editing a configuration file (config.json).
The config.json file should be placed in the root folder of the project, alongside with the index.html file.
You can copy ./public/config-sample.json to ./public/config.json and adopt the settings to your liking.
Here's a detailed list of properties you could add to your configuration file (just in case, we added a config-sample.json file you could learn from).
| Property | Type | Required? | Description |
|---|---|---|---|
| name | string |
true | The name of your app. |
| pages | array |
true | A list of pages in your app, each page will be presented as a separated tab, and will have his own methods and properties. |
| baseUrl | string |
false | Base url of the api. This will prefix the url of all the api methods defined for all pages. This is normally the domain plus a base path. For example: "https://restool-sample-app.herokuapp.com/api" Note: If different pages use different base urls this should not be used. Instead, you should explicitly define absolute urls for each method. |
| requestHeaders | object |
false | A list of key-value headers you wish to add to every request we're making. For example: { Authentication: 'SECRET_KEY', 'X-USER-ID': 'USER_ID' }. |
| errorMessageDataPath | string[] |
false | The path within an error response object to look for an error message. If multiple are provided, each will be tried in order until a message is found. |
| unauthorizedRedirectUrl | string |
false | Legacy option that takes priority over auth config: URL to redirect to when the API returns a 401 (Unauthorized) error. Use :returnUrl to pass a return location. For example: "/login?return=:returnUrl" |
| auth | object |
false | Built-in authentication configuration (used only if unauthorizedRedirectUrl is not set). See Auth Config below. |
| favicon | string |
false | A URL for you app's favicon. |
| customStyles | object |
false | Custom styles |
| customLabels | object |
false | Custom labels |
| customLink | string |
false | External Link for navigation item (instead of default page app) |
RESTool also support dynamic js configuration file.
Just replace the config.json file with config.js file with this content:
export default {
  // Content is the same as the json config file
}
NOTE: In case you're using the build folder, the config.js must be placed in the folder /build/static/js.
The auth property allows you to configure authentication endpoints. It has the following properties:
| Property | Type | Required? | Description | Expected Format |
|---|---|---|---|---|
| type | "sessioncookie" | "jwt" | "oauth2" | "basic" |
true | The authentication type. Currently only "sessioncookie" is implemented - other types will throw an error. |
- |
| loginEndpoint | string |
true | The endpoint to send the login request to. If the response header 'X-Change-Password' is set to 'true', the user will be redirected to the change password page. | Request: POST { username: string, password: string } Response: 200 OK with optional X-Change-Password: true header |
| logoutEndpoint | string |
true | The endpoint to send the logout request to. | Request: POST Response: 200 OK |
| userEndpoint | string |
true | The endpoint to get the user data from. It should return a JSON object with the property username. |
Request: GET Response: { username: string } |
| changePasswordEndpoint | string |
true | The endpoint to send password change requests to. | Request: PUT { oldPassword: string, newPassword: string } Response: 200 OK |
Example auth configuration:
{
  "auth": {
    "type": "sessioncookie",
    "loginEndpoint": "/auth/login",
    "logoutEndpoint": "/auth/logout",
    "userEndpoint": "/auth/user",
    "changePasswordEndpoint": "/auth/change-password"
  }
}RESTool provides a configurable authentication system that integrates with your backend API:
When using "type": "sessioncookie", the following behavior applies:
-
Request Handling
- All requests include
credentials: 'include'to ensure cookies are sent - Browser handles cookie management automatically
- All requests include
-
Authentication State
- RESTool verifies authentication by calling the configured
userEndpoint - The endpoint must return a user object containing at least
{ username: string }
- RESTool verifies authentication by calling the configured
-
Login Flow
- When any request returns
401 Unauthorized, RESTool displays the login form - After successful login, the original request is retried
- When any request returns
-
Password Change Flow
- If login response includes
x-password-change: trueheader - User is redirected to password change form
- After successful change, returns to original destination
- If login response includes
Each page is an object and represents a resource in your API. It should have the following properties:
| Property | Type | Required? | Description |
|---|---|---|---|
| name | string |
true | The name of the page. This will be presented in the menu. For translation support, it's recommended to leave this empty and define it in under the page's and field's namespace instead. See Internationalization (i18n) section. |
| id | string |
true | A unique identifier for the page. RESTool will use it to navigate between pages. |
| description | string |
false | A short description about the page and its usage. For translation support, it's recommended to leave this empty and define it in under the page's and field's namespace instead. See Internationalization (i18n) section. |
| requestHeaders | object |
false | A list of key-value headers you wish to add to every request we're making. For example: { Authentication: 'SECRET_KEY', 'X-USER-ID': 'USER_ID' }. |
| methods | object |
true | A list of all methods which are available in your RESTful API. |
| customActions | object[] |
false | A list of extra (non RESTful) endpoints available in your RESTful API. Specifically customActions is a list of PUT or POST method objects. Read more about custom actions here. |
| customLabels | object |
false | Custom labels |
A method object will tell RESTool how to work with your API. Available methods:
- getAll
- getSingle
- post
- put
- delete
Each method has the following common properties (which could be extended specifically for each use case):
| Property | Type | Required? | Description |
|---|---|---|---|
| url | string |
true | The url for making the request. The url could be either relative or absolute. If a baseUrl is defined then you should only provide a relative path. For example: /users/:id. The url could contain parameters that will be extracted if needed. For example: https://website.com/users/:id - note that the parameter name in the url should match the one you're returning in your API. |
| actualMethod | string ("get", "put", "post", "delete", "patch") |
false | Since not everyone implements the RESTful standard, if you need to make a 'post' request in order to update an exiting document, you may use this property. |
| requestHeaders | object |
false | Same as above, but for specific method. |
| queryParams | array |
false | An array of query parameters fields that will be added to the request. If your url includes the name of the parameter, it will be used as part of the path rather than as a query parameter. For example if your url is /api/contact/234/address you might make a parameter called contactId then set the url as follows: /api/contact/:contactId/address. Each query param item is an object. See input fields |
| fields | array |
false | A list of Input fields that will be used as the body of the request. For the getAll request, the fields will be a list to display fields and will be used to render the main view. |
We'll use this request in order to get a list of items from our API. This type of GET request has the following additional properties:
Use this field to let RESTool know from where it should extract the data from. For example, if your API is returning the following JSON response:
{
  success: true,
  data: []
}
The dataPath you'll want to use will be data.
If your API returning:
{
  success: true,
  data: {
    created: 1578314296120,
    items: []
  }
}
The dataPath will be data.items.
RESTool allows you to control how to output the data. The display object has a type property that will define how to display the data. RESTool supports two display type: "table" and "cards".
{
  "display": {
    "type": "cards"
  },
  ...
}
One or more paths to properties in the result object to sort the list by.
pagination (Pagination)
Optional. This allows to handle pagination. See Pagination.
Optional. Relevant only when using dynamic (js) config. A function to allow manipulation on the response data. Useful for changing\adding data for display purposes.
Here is an example for adding a new field named wiki to the data:
{
  ...
  "dataTransform": items => items.map(item => Object.assign(item, { wiki: `https://en.wikipedia.org/wiki/${item.name}` }))
}
This method will be fired once you hit the edit button on an item in order to get a single item's data. By default, if this method hasn't been set, when editing an item, RESTool will take the raw data from the original getAll request.
An example of a getSingle request:
{
  "url": "/character/:id",
  "dataPath": "data",
  "queryParams": [],
  "requestHeaders": {}
}
Optional. Relevant only when using dynamic (js) config. A function to allow manipulation on the response data. Useful for changing\adding data for display purposes.
Here is an example for adding a new field named wiki to the data:
{
  ...
  "dataTransform": item => Object.assign(item, { wiki: `https://en.wikipedia.org/wiki/${item.name}` })
}
The post method will be used to create new items in your API resource.
Example:
{
  "url": "/character",
  "fields": [
    {
      "name": "name",
      "label": "Name",
      "type": "text"
    },
    {
      "name": "location",
      "label": "Location",
      "type": "select",
      "options": ["Kings Landing", "Beyond the Wall", "Winterfell"]
    },
    {
      "name": "isAlive",
      "label": "Alive?",
      "type": "boolean"
    }
  ]
}
Optional. Relevant only when using dynamic (js) config. A function to allow manipulation on the data before making the request.
Here is an example for transforming an array of ids into an array of objects.
{
  ...
  "dataTransform": (body) => {
    body.character.ids = body.character.ids.map((id) => {
      return {
        id: id,
      }
    })
    return body
  },
  ...
}
The put method will be used to update an existing item in your API resource.
Example:
{
  "put": {
    "url": "/character/:id",
    "actualMethod": "post",
    "includeOriginalFields": false,
    "fields": [
      {
        "name": "location",
        "label": "Location",
        "type": "select",
        "options": ["Kings Landing", "Beyond the Wall", "Winterfell"]
      },
      {
        "name": "isAlive",
        "label": "Alive?",
        "type": "boolean"
      }
    ]
  }
}
When set to true, all fields from the original object are merged and sent in the request body.
Default is false.
Optional. Relevant only when using dynamic (js) config. A function to allow manipulation on the data before making the request.
Here is an example for transforming an array of ids into an array of objects.
{
  ...
  "dataTransform": (body) => {
    body.character.ids = body.character.ids.map((id) => {
      return {
        id: id,
      }
    })
    return body
  },
  ...
}
The delete method will be used to delete an existing item in your API resource.
Example:
{
  "delete": {
    "url": "/character/:id"
  }
}
The pagination property allows you to handle pagination on .
Here's a list of variable names you may change:
| Name | Value | Description |
|---|---|---|
| type | `'buttons' | 'infinite-scroll'` |
| source | 'query' |
Where the pagination parameters are written to. Only supports query parameters for now. |
| params | object |
Parameters definition for pagniation purposes. See below. |
| fields | object |
Definition of informations that will be returned by the API. See below. |
The params field has the following properties that all can be defined with a input field
| Name | Value | Required? | Description |
|---|---|---|---|
| page | object |
true | The parameter definition of the page number. |
| limit | object |
false | The parameter definition of the maximum number of items to be returned by the API. |
| sortBy | object |
false | The parameter definition of the sorting value. |
| descending | object |
false | The parameter definition of the order in which the API should return items. false by default. |
The fields field has the following properties that all can be defined with a { dataPath: string } object
| Name | Value | Required? | Description |
|---|---|---|---|
| total | object |
False | The total of items available on the API endpoint. This will allow RESTool to know when there is no more pages to navigate to. |
A list of extra (non RESTful) endpoints available in your RESTful API. Specifically customActions is a list of PUT or POST method objects. For example this could enable an endpoint like: PUT /users/:id/disable
These use the same format as the method objects defined below.
The default HTTP method used is PUT but this can be overwritten using the
actualMethodparameter.
If
customActionsis not empty then for each action RESTool will generate an action button on each data row.
You may configure the icon of the action by adding an
iconproperty. RESTool uses font-awesome and you may use any icon name you want from their collection.
Here's an example for a configuration of 2 custom actions:
{
  "customActions": [
    {
      "name":"Send Email",
      "url": "/character/:id/sendEmail",
      "actualMethod": "post",
      "icon": "envelope",
      "fields": [
        {
          "name": "id",
          "type": "text",
          "label": "ID",
          "readonly": true
        },
        {
          "name": "title",
          "type": "text",
          "label": "Email Title",
          "required": true
        },
        {
          "name": "body",
          "type": "text",
          "label": "Email Body",
          "required": true
        }
      ]
    },
    {
      "name":"Disable Character",
      "url": "/character/:id/disable",
      "actualMethod": "post",
      "icon": "minus-circle",
      "fields": [
        {
          "name": "id",
          "type": "text",
          "label": "Contact ID",
          "readonly": true
        }
      ]
    }
  ]
}
Optional. Relevant only when using dynamic (js) config. A function to allow manipulation on the body data. Useful for changing/adding data before the PUT.
Here is an example for changing payload to literal:
{
  ...
  "dataTransform": item => { return item.value}
}
The customStyles property allows you to control the look & feel of your RESTool app. The object will contains a vars property where you'll be able to change the deafult colors of RESTool.
Here's a list of variable names you may change:
| Name | Value | Description |
|---|---|---|
| appText | string |
Root text color. |
| appBackground | string |
App background color. |
| navBackground | string |
Navigation menu background color. |
| navText | string |
Navigation menu text color. |
| navItemText | string |
Navigation item text color. |
| navItemHoverBackground | string |
Navigation item background color on hover event. |
| navItemActiveBackground | string |
Active navigation item background color. |
| actionButtonBackground | string |
Action button background color. |
| actionButtonHoverBackground | string |
Action button background color on hover event. |
| actionButtonText | string |
Action button text color. |
| cardBackground | string |
Card background color. |
| addButtonText | string |
Add button text color. |
| addButtonBackground | string |
Add button background color. |
| addButtonHoverBackground | string |
Add button background color. (hover event) |
| submitButtonText | string |
Submit button text color. |
| submitButtonBackground | string |
Submit button background color. |
| submitButtonHoverBackground | string |
Submit button background color. (hover event) |
Usage example in config.json file:
{
  ...
  "customStyles": {
    "vars": {
      "appBackground": "#888",
      "navBackground": "#333"
      "navItemHoverBackground": "#454545"
    }
  }
}
⚠️ Deprecated. Use i18n language files instead. See Internationalization (i18n) section.
The customLabels property allows you to control the different labels that are shown across the pages of your RESTool app. The object has three fields that contain properties that you can customize: buttons, formTitles, placeholders, successMessages and pagination.
List of variable names you may change within the buttonsproperty:
| Name | Value | Description | Default value |
|---|---|---|---|
| addItem | string |
Content of the add button on a page. | + Add Item |
| editItem | string |
Title of the edit button on a row or a card. | Edit |
| deleteItem | string |
Title of the delete button on a row or a card. | Delete |
| clearInput | string |
Title of the clear button on form inputs. | Clear |
| closeForm | string |
Title of the close button in forms. | Close |
| addArrayItem | string |
Title of the add button on arrays inputs in forms. | Add Item |
| submitItem | string |
Content of the submit button on forms. |
List of variable names you may change within the formTitles property:
| Name | Value | Description | Default value |
|---|---|---|---|
| addItem | string |
Content of the add button on a page. | Add Item |
| editItem | string |
Title of the edit button on a row or a card. | Edit Item |
List of variable names you may change within the placeholders property:
| Name | Value | Description | Default value |
|---|---|---|---|
| object | string |
JSON input placeholder. | Enter JSON... |
| array | string |
JSON array input placeholder. | Enter JSON array... |
| text | string |
Text input placeholder. | Enter text... |
| number | string |
Number input placeholder. | 0 |
| color | string |
Color input placeholder. | Enter color... |
string |
Email input placeholder. | Enter email... | |
| password | string |
Password input placeholder. | Enter password... |
| date | string |
Date input placeholder. | Enter date... |
| file | string |
File input placeholder. | Select file... |
List of variable names you may change within the successMessages property:
| Name | Value | Description | Default value |
|---|---|---|---|
| addItem | string |
Success message for adding an item. Set to null to disable the message toast. | Item added successfully |
| editItem | string |
Success message for editing an item. Set to null to disable the message toast. | Item updated successfully |
| deleteItem | string |
Success message for deleting an item. Set to null to disable the message toast. | Item deleted successfully |
| customActions | string |
Success message for custom action. Set to null to disable the message toast. | Action completed successfully |
List of variable names you may change within the pagination property:
| Name | Value | Description | Default value |
|---|---|---|---|
| itemsCount | string |
Label displaying the items count when pagination option is on with type infinite-scroll. Use :currentCountFrom, :currentCountTo and :totalCount to display relevant data anywhere in your custom label. |
Showing :currentCountFrom-:currentCountTo out of :totalCount items |
| editItem | string |
Title of the edit button on a row or a card. | Edit Item |
Usage example in config.json file:
{
  ...
  "customLabels": {
    "buttons": {
      "addItem": "+ New item",
      "editItem": "Modify"
    },
    "formTitles": {
      "addItem": "New item form"
    },
    "placeholders": {
      "color": "Enter color in HEX format..."
    },
    "successMessages": {
      "addItem": "GOT character added successfully",
      "editItem": "GOT character edited successfully",
      "deleteItem": "GOT character deleted successfully",
      "customActions": "GOT action completed successfully"
    },
  }
}
The list of fields you want to present in the main view of the app. Each one is an object and could have the following properties:
| Property | Type | Required? | Description |
|---|---|---|---|
| name | string |
true | The property name of the field that contains the value in the API result. |
| type | string |
true | This will help RESTool to render the main view. See a list of available type below. |
| label | string |
false | A label that describes the field. Will be presented as table headers in the main view. For translation support, it's recommended to leave this empty and define it in under the page's and field's namespace instead. See Internationalization (i18n) section. |
| dataPath | string |
false | Read more about dataPath here. |
| filterable | boolean |
false | Set to true to enable a text control to do simple client-side filtering by values of this field. Can be specified for multiple fields. |
| truncate | boolean |
false | Causes long values to be truncated. By default, truncation is not enabled for fields. |
| htmlCode | string |
false | HTML code to display in a cell. Use {value} to insert item value at this place. |
| queryShortcut | object |
false | A shortcut to add a query parameter to the url. For example, if you have a field called "name" and you want to add a query parameter called "name" with the value of the field, you can set this to "name". Object example: { name: 'search', value: 'name=' } |
| url | string |
false | If the type of the field is set to url, this property can be used to provide a custom URL that receives the value of this field as a parameter. If url is not provided, the value of the field will be the target of the anchor. Example below. |
Example for URL field:
fields: [
  {
    "name": "someValue",
    "type": "url",
    "label": "External",
    "url": "https://example.com/products/:someValue"
  }
]Here's a list of available display field types:
text- will parse the value as a texturl- will render an anchor element with a clickable linkimage- will render an image from the urlcolorbox- will render a #RRGGBB hex string as an 80 x 20 pixel colored rectangle, overlaid with the hex color stringboolean- will render as a green or red dot
A list of fields you want us to send as the body of the request. Each one is an object and could have the following properties:
| Property | Type | Required? | Description |
|---|---|---|---|
| name | string |
true | The name of the field / parameter to be sent. |
| label | string |
false | A label that describes the field. This will act as a label in RESTool's forms. |
| dataPath | string |
false | Use this field to let RESTool know what is the path of this field in the body of the request. Read more about dataPath here. |
| type | string |
true | Use the type field to define the type of the field. See a list of available type below. |
| options | string[] |
false | Add the options field if you chose a select as a type. This field should contain an array of options to be displayed in the select box. For example: ["Amazon", "Google", { "display": "Microsoft", "value": "ms" }] |
| arrayType | string |
false | For array field type, you should specify another property called arrayType so RESTool will know how to present & send the data in the POST and PUT methods. Array type could be object or text. |
| value | any |
false | Set a default value to the field. |
| required | boolean |
false | If true, a field will be marked as required on PUT and POST forms. |
| readOnly | boolean |
false | If true, a field will be displayed, but not editable. It's data will still be added to the PUT and POST requests. |
| placeholder | string |
false | Input field placeholder. |
| accept | string |
false | An optional setting for file type inputs. When set, the file input's accept property will perform file type filtering when browsing for files. For example: { "accept": ".png,.jpeg,image/*" } |
| useInUrl | boolean |
false | If true, a field can be used as a parameter in a PUT url. Otherwise only fields retrieved in the original GET can be used as parameters. It's data will still be added to the PUT request body. |
| optionSource | object |
false | Use the optionSource field to load options for a select box from a REST service. If this is used with options, the items from options will be added to the select box before those fetched from the api. Read more about it here. |
| multi | boolean |
false | If true, select-multi dropdown will allow for multiple selections from a pre-defined list. Make sure defining the right input type first: "type": "select-multi". |
| selectLimit | number |
unlimited | An optional setting for limiting the multiple selections from a pre-defined list. |
| showFieldWhen | function |
false | A function that dynamically controls field visibility and inclusion in API requests. Only available when using dynamic (js) config. The function receives an array of all current form fields and must return a boolean value. When true, the field is displayed in the form and included in API requests. When false, the field is hidden and null value is sent with the API requests. Use the originalName property to reference other fields in your conditions. Common use cases: - Show additional fields based on a dropdown selection - Show advanced options based on other field values - Create dependent field relationships Example: "showFieldWhen": (fields) => { return fields.find(f => f.originalName === 'jobTitle')?.value === 'boss';} |
Available options:
text- A simple text input (if "type" is not defined, text will be the default).long-text- A larger text inputobject- An object type of field (will use JSON.stringify() to present it, and will parse on update).encode- If you want the value to be encoded before being sent, use this type. GET All page only.integer- A text box for positive and negative integers.number- A text box for positive and negative floating point numbers.boolean- This will render a checkbox.date- A text box for date format. Falls back to a simple text input on unsupported browsers.email- A text box for an email address. Falls back to a simple text input on unsupported browsers.color- A color selector yielding #RRGGBB hex value strings. Falls back to a simple text input on unsupported browsers.select- This will render a select box. See options and optionSource propertiesselect-multi- This will render a multiselect box by means of multiselect-react-dropdown third-party component.array- Enter multiple values. POST and PUT page only.file- A file-input form element, to upload files asContent-Type: multipart/form-data. All non-file form inputs will be sent as individual string values. The current implementation supports only one file input per form.password- A password text box.note- A plain text note within the other fields. Usenoteproperty for text.labelis optional.hidden- Set to true if you want the value to be sent but not to be editable.
Use the optionSource field to load options for a select box from a REST service. If this is used with options, the items from options will be added to the select box before those fetched from the api.
You can use the following properties on the optionSource object:
url- url to fetch data fromdataPath- let us know where we should take the data fromdisplayPath- property of the object to take the display value fromvaluePath- property of the object to take the option value fromsortBy- one or more properties to sort the objects byqueryParamAlias- query parameter alias used in multiselect's onSearch function. Default value isq
For example:
fields: [
  {
    name: "bestFriend",
    label: "Best Friend",
    type: "select",
    optionSource: {
      url: "https://restool-sample-app.herokuapp.com/api/character",
      dataPath: null,
      displayPath: "name",
      valuePath: "id",
      sortBy: ["name"]
    }
  }
]
fields: [
  {
    name: "bestFriend",
    label: "Best Friend",
    type: "select-multi",
    multi: true,
    optionSource: {
      url: "https://restool-sample-app.herokuapp.com/api/character",
      dataPath: null,
      displayPath: "name",
      valuePath: "id",
      sortBy: ["name"]
    }
  }
]
Searhcing for Arya keyword results in the following request URL: https://restool-sample-app.herokuapp.com/api/character?q=Arya
fields: [
  {
    name: "bestFriend",
    label: "Best Friend",
    type: "select-multi",
    multi: true,
    optionSource: {
      url: "https://restool-sample-app.herokuapp.com/api/character",
      dataPath: null,
      displayPath: "name",
      valuePath: "id",
      sortBy: ["name"]
      queryParamAlias: "friend"
    }
  }
]
Searhcing for Arya keyword results in the following request URL: https://restool-sample-app.herokuapp.com/api/character?friend=Arya
Use this field to help RESTool understand what's the path to get to the field's value in the raw data. For example, if this is a single result's data:
[
  {
    name: 'Daniel',
    email: 'daniel@awesome.com',
    details: {
      isAwesome: true,
      numberOfChildrens: 1
    }
  },
  ...
]
And you want to present the numberOfChildrens field in the main view, the data path for this field will be details, and the name should be numberOfChildrens.
dataPath also supports extracting value from an array:
[
  {
    childrens: [
      {
        nickName: 'Spiderman'
      },
      {
        nickName: 'Ironman'
      }
    ]
  },
  ...
]
You may use the following data path to extract the first children's nickName: childrens.0 and the field's name will be nickName.
Another usage of this field is to help RESTool to build up the request body. Let's assume that you want to build the following request body:
{
  name: 'Daniel',
  details: {
    thumbnail: {
    url: 'http://bit.ly/2fqDxfQ'
    }
  }
}
The field name will be url, the type will be text, and the data path will be details.thumbnail. RESTool will build the body of the request dynamically according to the dataPath and name of the field.
RESTool supports internationalization (i18n) of your application through language files. This allows you to provide your application in multiple languages.
-
Create language files in the
src/localesdirectory (e.g.,fr.json,de.json, ...) with translations. Use theen.jsonfile as a template for the structure of the language files. -
The browser language is automatically detected and the corresponding language file is loaded. Falls back to English (en) if the detected language is not available.
Define the title and description of a page in the language files under the page's namespace.
Use the id of the page as defined in the configuration file.
For example, for the "Characters" page:
{
  "pages": {
    "characters": {
      "title": "Personnages",
      "description": "Liste des personnages"
    }
  }
}Define the field labels in the language files under the namespace of the page.
Use the id of the page as defined in the configuration file.
Then define the translations of the field labels under the fields property with the field name as the key.
For example, for the "Characters" page:
{
  "pages": {
    "characters": {
      "fields": {
        "name": "Nom",
        "age": "Âge",
      }
    }
  }
}You can also override all translations of the global namespace for a specific page.
{
  "pages": [
    {
      "characters": {
        "title": "Personnages",
        "description": "Liste des personnages",
        // Page-specific translations, overwrites translations of the `global` properties
        "buttons": {
          "addItem": "Ajouter un personnage",
          "editItem": "Modifier",
        }
      }
    }
  ]
}Clone RESTool repository to get started.
git clone https://github.com/dsternlicht/RESTool.git
cd RESTool
Install project dependencies by running:
npm i
We used React for developing this awesome tool so no need to install anything globally.
In order to start developing:
- Make sure you copy the
/public/config-sample.jsonto/public/config.json. - Start the mocks server by running
npm run server. - Start the development server by running
npm start. - Browse to
http://localhost:3000/. - The app will automatically reload on changes.
Once you're ready, run npm run build in order build the project. The build artifacts will be stored in the build/ folder.
The build folder is the one you want to deploy to your server.
- Copy the
buildfolder with all of its content. - Edit the
config.jsonfile, and add your configuration. - Deploy the
buildfolder to your servers, and make sure you serve theindex.htmlfile. - Enjoy! 😎
Instead of using the build folder, you may also consume RESTool as a script from CDN in an HTML page:
<script src="https://unpkg.com/restool"></script>
In this case you'll want to set a config file directly on the window object:
<script>
  window.RESTool = {
    config: {
      remoteUrl: '{CONFIG_FILE_URL}'
    }
  };
</script>
Full example:
<!DOCTYPE html>
<html lang="en">
  <head>
    <meta charset="utf-8" />
    <meta name="viewport" content="width=device-width, initial-scale=1" />
    <title>RESTool App</title>
  </head>
  <body>
    <script>
      window.RESTool = {
        config: {
          remoteUrl: '{CONFIG_FILE_URL}'
        }
      };
    </script>
    <script src="https://unpkg.com/restool"></script>
  </body>
</html>
- Daniel Sternlicht
- Oreli Levi
- Jonathan Sellam