![]()
"Demand Response with ZigBee and mbaigo."
The public code repo.
This project aims to reduce society's energy consumption by controlling smart power devices, making adjustments according to the daily power market and the local weather. Powered by a Internet-of-Things cloud that you can run locally and privately, using an alternative Arrowhead implementation in Go.
An initial hardware setup is required before being able to run the systems and devices. Following documents how to set up a Raspberry Pi as a host for the cloud.
-
Connect the Micro SD card into your computer.
-
Download Raspberry Pi OS using the Raspberry Pi Imager downloaded at, for Raspberry Pi Connect to work the Raspberry Pi has to run Raspberry Pi OS bookworm or later: https://www.raspberrypi.com/software/
-
Follow the instruction and wait until the OS is loaded onto the SD card.
-
Insert the SD card into the Raspberry Pi, connect it to power and connect it to a screen with a micro-HDMI to HDMI cable.
-
When the Raspberry Pi has started, connect a keyboard and mouse to it.
-
Either connect the Raspberry Pi to internet with an Ethernet cable or in the top right corner connect the Raspberry Pi to a wireless internet.
- Run the following two commands in a terminal on the Raspberry Pi:
sudo apt update
sudo apt full-upgrade
-
The following command installs Raspberry Pi Connect:
sudo apt install rpi-connect -
After the installation is done run the following command to turn it on:
rpi-connect on
-
The previous command should have opened a browser prompting you to sign in with a Raspberry Pi ID, if not do the following:
- In the top right corner, an icon with a circle with two squares should have appeared, clicking on that and choosing “sign in” should open the browser.
-
Sign in with a Raspberry Pi ID on this site, if you don’t have one it is free to create one.
-
After that assign a name to the device and press the blue button.
-
To be able to remote access your Raspberry Pi even after a restart the following command is required in the terminal:
loginctl enable-linger
Now you can access your Raspberry Pi remotely even when being on different internet if the Raspberry Pi has internet connection. You can either access it via screensharing or with a shell on the following link:
https://connect.raspberrypi.com/
This allows you to use your Raspberry Pi without needing to have a screen, keyboard or mouse connected to it, all you need is power supplied to it and internet connection.
This application is required for handling the communication between the ZigbeeHandler and the Zigbee devices.
- Open the terminal and do the following commands, this installs the dependencies:
sudo apt update
sudo apt install i2c-tools build-essential raspberrypi-kernel-headers
- After that download the installation archive:
curl -O -L https://github.com/dresden-elektronik/raspbee2-rtc/archive/master.zip
unzip master.zip
-
Then go into the extracted directory:
cd raspbee2-rtc-master -
Compile the RTC kernel module:
make -
Install the RTC kernel module:
sudo make install -
Reboot the Raspberry Pi:
sudo reboot -
After the Raspberry Pi has restarted the user access rights of the serial interface has to be configured, this is done by running the following command:
sudo raspi-config -
Set the following configurations:
Interface Options -> Serial Port
- Would you like a login shell accessible over serial? -> No
- Would you like the serial port hardware to be enabled? -> Yes
-
Reboot the Raspberry Pi again for the access rights becomes active.
-
When the Raspberry Pi has restarted import the Phoscon public key with the following command:
wget -qO- https://phoscon.de/apt/deconz.pub.key | gpg --dearmor | \
sudo tee /etc/apt/trusted.gpg.d/deconz-keyring.gpg >/dev/null
- After this configure the APT repository for deCONZ:
sudo sh -c "echo 'deb http://phoscon.de/apt/deconz \
generic main' > /etc/apt/sources.list.d/deconz.list"
-
Then update the APT package list:
sudo apt update -
Lastly install deCONZ with the following command:
sudo apt install deconz -
The deCONZ program can now be found via the application menu: Menu -> Programming -> deCONZ
- Start deConz application

- Click the Phoscon app button (top right) NOTE: This will open a browser guiding you to the phoscon page to add new devices

- If you've already set up the gateway, click your gateway and skip to next step (Open menu/Select Gateway)
- Click Phoscon-GW

- Fill out name, and password
- Seems like a button is missing, click ENTER when you've typed in password again
- Create the first group, e.g. kitchen
- Open menu (click the three lines on the top-left part of the webpage)

- Select Gateway

- Click Advanced

- Scroll down to "Authenticate app" and click it

- Open a command prompt and use the below command to generate an API key
- curl -v -X POST "http://localhost:8080/api" -d '{"devicetype": "ZigBee system"}'
- Your api key is in the red box after "username":
- e.g. "username":"A123BCD" would mean your api key is A123BCD

- Start deConz application
- Click the Phoscon app button (top right) NOTE: This will open a browser guiding you to the phoscon page to add new devices
- If you've already set up the gateway, click your gateway and skip to next step (Open menu/Select Thermostats)
- Click Phoscon-GW
- Fill out name, and password
- Seems like a button is missing, click ENTER when you've typed in password again
- Create the first group, e.g. kitchen
- Open menu (click the three lines on the top-left part of the webpage)
- Select Thermostats in the menu

- Click Connect new thermostat
- Start smart thermostat
- Put thermostat in pairing mode (Should be found in user manual)
- e.g. hold button 10sec to enter pairing mode
- Click Connect new thermostat
- Add a new unitasset for the smart thermostat in the systemconfig.json (There's a template for them created on system start)
- Add a name
- Add a model
- "type": "ZHAThermostat" as shown in example below
- Add the API key
- Add uniqueid
- Currently have to open a command prompt and use the below command to find uniqueid. Insert API key generated in [apikey]
- ~curl -v "http://localhost:8080/api/[apikey]/sensors" | jq
- Find the last connected device with type: "ZHAThermostat"
Example:

- Start deConz application
- Click the Phoscon app button (top right) NOTE: This will open a browser guiding you to the phoscon page to add new devices
- If you've already set up the gateway, click your gateway and skip to next step (Open menu/Select Plugs)
- Click Phoscon-GW
- Fill out name, and password
- Seems like a button is missing, click ENTER when you've typed in password again
- Create the first group, e.g. kitchen
- Open menu (click the three lines on the top-left part of the webpage)
- Select Plugs in the menu

- Connect plug to outlet and turn it on
- Put smart plug in pairing mode (Should be found in user manual)
- e.g. hold button for 4 seconds to enter pairing mode
- Put smart plug in pairing mode (Should be found in user manual)
- Click Add new Plug
- It should have automatically found the smart plug
- Connect plug to outlet and turn it on
- Add a new unitasset for the smart thermostat in the systemconfig.json (There's a template for them created on system start)
- Add a name
- Add a model
- "type": "Smart plug" as shown in example below
- Add the API key
- Add uniqueid
- Add period (in seconds, used by a function to check room temp)
- NOTE: If the plug should be controlled by a switch, set period to 0
- Currently have to open a command prompt and use the below command to get uniqueid and model.
- curl -v "http://localhost:8080/api/B3AFB6415A/lights" | jq
- Find the last connected device with type: "ZHAPlug"
Example:

- System configurations for Raspberry Pi
- Enable 1-wire in raspi-config tool
- sudo raspi-config
- Select Advanced Option -> 1-Wire -> Yes
- sudo raspi-config
- As root append "dtoverlay=w1-gpio-pullup,gpiopin=26" to /boot/firmware/config.txt with below command
- echo "dtoverlay=w1-gpio-pullup,gpiopin=26" >> /boot/firmware/config.txt
- Restart the Raspberry Pi to enable the settings Above guide to enable 1-Wire was copied from waveshare.com
- Enable 1-wire in raspi-config tool
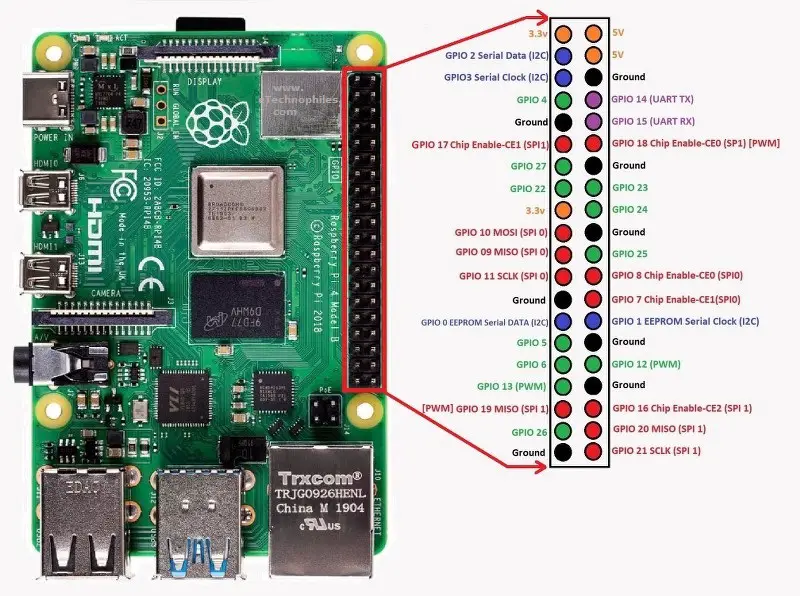
- Set up breadboard, connect temp. sensor, resistor (4k Ohm) and wires


- Connect breadboard to Raspberry Pi
- Green wire to 3.3v
- Blue wire to ground
- Yellow wire to GPIO 26

Above picture copied from etechnophiles.com
- Completed setup

- Start deConz application
- Click the Phoscon app button (top right) NOTE: This will open a browser guiding you to the phoscon page to add new devices
- If you've already set up the gateway, click your gateway and skip to next step (Open menu/Select Switches)
- Click Phoscon-GW
- Fill out name, and password
- Seems like a button is missing, click ENTER when you've typed in password again
- Optional: Create the first group, e.g. Living room, can close the popup by pressing the X (top-right of popup)
- Open menu (click the three lines on the top-left part of the webpage)
- Select Switches in the menu

- Click Add new switch
- Start wireless remote switch
- Put the wireless remote switch in binding/pairing mode (Should be found in user manual)
- e.g. hold button 10sec to enter binding mode
- Click Add new switch
- Add a new unitasset for the smart switch in the systemconfig.json (There's a template for them created on system start)
- Add a name
- Add a model
- "type": "ZHASwitch" as shown in example below
- Add the API key
- Add uniqueid
- Add slaves uniqueid (The smart power plugs/smart lights its supposed to control)
- All lights/plugs be found by using the
curl -v "http://localhost:8080/api/[apikey]/lights" | jqcommand Example of complete switch unit asset:
- All lights/plugs be found by using the
- Currently have to open a command prompt and use the below command to find uniqueid. Insert API key generated in [apikey]
-
curl -v "http://localhost:8080/api/[apikey]/sensors" | jq - Find the last connected device with type: "ZHASwitch"
Example:

-
The easiest way to run the systems in a local cloud is by using Docker and its tools. These can first be installed by running:
# Add Docker's official GPG key:
sudo curl -fsSL https://download.docker.com/linux/ubuntu/gpg -o /etc/apt/keyrings/docker.asc
sudo chmod a+r /etc/apt/keyrings/docker.asc

# Add the repository to Apt sources:
echo \
  "deb [arch=$(dpkg --print-architecture) signed-by=/etc/apt/keyrings/docker.asc] https://download.docker.com/linux/ubuntu \
  $(. /etc/os-release && echo "$VERSION_CODENAME") stable" | \
  sudo tee /etc/apt/sources.list.d/docker.list > /dev/null
sudo apt update
sudo apt install docker docker-compose
Source: https://docs.docker.com/engine/install/ubuntu/
Run:
cd /srv
git clone "https://github.com/lmas/d0020e_code.git" src
git clone "https://github.com/lmas/mbaigo-systems.git" mbaigo
Now /srv/src will contain the source code of our custom systems, while /srv/mbaigo will contain the source code of the core systems. Inside both directories exists Dockerfile that is used for building docker container images.
Next, create a symbolic link to the docker-compose file while still being in the /srv/ dir:
ln -s src/docker-compose.yml docker-compose.ym
This compose file will build local container images for all systems and allow running them as containers.
Starting the containers:
sudo docker-compose up -d
Stopping the containers:
sudo docker-compose down
Printing and tailing the container logs:
sudo docker-compose logs -f
Inspecting a running container:
sudo docker exec -it <mycontainer> sh
Rebuilding all containers:
sudo docker-compose build --no-cache